Creating A Terrarium – The Perfect Little Garden
The basis for planting a terrarium comprises 4 layers. The best way to insert the layers of soil is to put a funnel (maybe cardboard) into the vessel in order not to make its walls dirty.
The bottom layer, the drainage layer consists of sand, pebbles, gravel or very coarse sand. Direct drainage is very important to ensure that the soil does not become condensed, which can lead to the destruction of the root or plant. Depending on the size of the container, you should place at least 1 inch of drainage material uniformly along the entire length of the terrarium. For the broad and deep vessels, this thickness should be 2-2,5 inches. The pebbles for drainage should be washed with clean, hot water before use.

climatekids.nasa.gov
On the top of the drainage layer, it is good to put a thin layer of charcoal because of filtering and maintaining cleanliness. This layer allows the air to clean itself from the vapors that occur when organic materials begin to break down and prevents direct contact of the root with the water collected at the bottom.
The third layer is a thin layer of peat moss that is placed between the first two layers. Its aim is to prevent seepage of the soil into the drainage layer (it separates the soil that accumulates at the bottom in the pebbles).
The last layer is soil. On the market there are special mixes which are intended for terrariums, which consist of soil that has sand in it. If you are using this mixture of soil, you should not add fertilizer for planting because it is already nutritionally adequate. Too much fertilizer can lead the plants to grow out of their vessel very soon. If you want to create a “desert garden”, add additional sand in the mixture and additional layer of gravel in the drainage layer. A layer of soil should be 2,5-3 inches, depending on the size of the container or bottle.

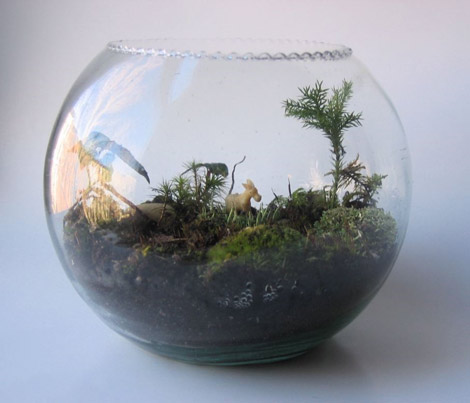
If the lower layers of the terrarium is placed evenly, the terrarium will look more interesting if you do outlines of landscapes using the soil. You can create terraces, valleys and hills. Create the hills in the background and make the valleys in the foreground. Add decorative elements such as colored stones, wood detail, dry root, a small statuette etc.
When you have selected the terrarium container and you have the plants, you are ready to work!

It is necessary to structure and set up your small landscape in a way that will leave the best visual effect on the observer. For example, if the terrarium would be seen from all sides, the large plant should be placed in the middle and the smaller plants around it. If your terrarium is to be observed only from one side, the highest plant should be placed in the back of the container and the lowest plants should be first.
Before planting, in another bowl try to do the desired schedule.

For example, find a jar with a diameter as the container for the terrarium and arrange elements inside. When you find an arrangement you like, transfer the plants one by one and create a scene as previously created. you can also draw on paper the desired layout.
Tools
You don’t need to purchase special tools – you can make yourself the funnel for adding soil out of cardboard and kitchen spoon can serve as a shovel (depending on the depth of the dish, the spoon can be attached to a stick), fork will serve as paddle, use small scissors for pruning and longer tweezers for lowering and planting the plants.

The first step is cleaning the vessel with water and detergent. The pebbles, charcoal and soil are put into the container using a funnel. Make a hole in the ground that will be a bit deeper, so plants are not tipped over after installation. Then, carefully remove the plants from the fields hitherto habitats, taking care not to damage the roots. Let the roots stay compact. Unlike real garden it is not necessary to loosen the roots, because we do not want the plants in the terrarium to grow too fast.

Carefully thread the plant through the throat of the container and drop it into the hole. Be careful not to damage the leaves through the narrow opening of the throat. When the plant is in the hole, carefully using the tool, put some soil around the plant and smooth it out. For this purpose you can use a cork which is poked on a stick.

Do not clutter the plants or place them next to the walls of the container. Leave enough space for them to grow and spread without tangling with other plants. After planting, slightly moist the soil.
Finally, it is preferably to put cover on the terrarium. Check frequently whether condensation occurs on the walls of the pot or on the cover. If too wet, leave the cover open for a while until excess moisture has evaporated. However balanced, the terrarium should always have a little moisture on the glass. If condensation does not occur, add a little water. But just a little water, because the terrarium has no way to drain excess water. Too much water leads to a possibility of fungi and mold. Fully closed terrariums require little water or no water. If it is not fully closed, you will need to add water once a week or less (depending on how open the terrarium is).
Make sure that the plants do not dry up and wither
 Sometimes it will be necessary to remove or replace the withered plant. Diseased plants should be removed immediately. Also, if a plant is growing too fast and outgrows its container, it should be replaced.
When the terrarium is ready, place it by the window with orientation which will be best for the plants you have used. For example, if the plants require more light, place it in the west or the south window, and if they need dim light, place it on the window that overlooks the north or the east. Do not place it in the sun and do not place it too close to a heat source.


